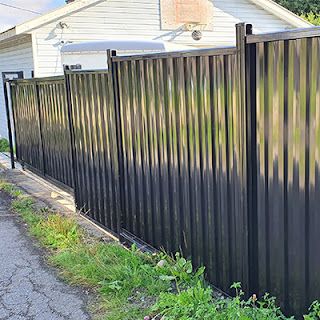
Comprehensive Guide to Installing a Corrugated Metal Fence
In this detailed guide, we will walk you through the process of installing a Corrugated Metal Fence Installation step by step. A well-constructed metal fence not only enhances the security of your property but also adds a touch of modern aesthetics. Let's delve into the intricacies of this installation process to help you achieve a professional and durable fence that can withstand the test of time.

Materials You'll Need
Before diving into the installation, gather the following materials:
- Corrugated Metal Panels: Choose high-quality panels suited for outdoor use.
- Fence Posts: Opt for sturdy metal or pressure-treated wood posts for longevity.
- Concrete Mix: Essential for securing the posts firmly in the ground.
- Gravel: Use gravel for drainage at the bottom of the post holes.
- Screws or Nails: Depending on the type of panels, select appropriate fasteners.
- Post Hole Digger: Makes digging uniform holes easier.
- Level: Ensures your fence is straight and level.
- Tape Measure: For precise measurements.
- Safety Gear: Don't forget gloves, goggles, and other protective equipment.
Planning and Preparation
Determine Fence Layout: Mark the boundaries of your fence using stakes and string. Consider the height and length of the fence for proper planning.
Check Local Regulations: Before starting, check local building codes and regulations regarding fence height, setback requirements, and any necessary permits.
Acquire Materials: Purchase all required materials based on your fence design and measurements. Ensure everything is on-site before beginning the installation.
Step-by-Step Installation Process
1. Digging Post Holes
- Use the post hole digger to dig holes for the fence posts. The depth should be at least one-third of the post's length, with additional depth for gravel at the bottom.
- Space the holes evenly according to your fence design, typically 6 to 8 feet apart.
- Ensure the holes are straight and aligned by using a level.
2. Installing Fence Posts
- Place the fence posts into the holes, making sure they are upright and level.
- Fill the holes with concrete mix, following the manufacturer's instructions for the proper water-to-mix ratio.
- Use the level to check the alignment of each post before the concrete sets.
3. Attaching Corrugated Metal Panels
- Measure and cut the Corrugated Metal Fence Installation panels to fit between the posts.
- Secure the panels to the posts using screws or nails, starting from one end and working your way across.
- Overlap the panels slightly for stability and a seamless look.
4. Finishing Touches
- Trim any excess panel material for a clean finish.
- Inspect the entire fence for any loose panels or protruding fasteners, and make necessary adjustments.
- Apply a protective coating or paint to the metal panels for added durability and weather resistance.
Conclusion
By following these detailed steps, you can successfully install a robust and visually appealing Corrugated Metal Fence Installation Remember to prioritize safety during the installation process and double-check measurements and alignment for a professional result. Enjoy the enhanced security and aesthetic value that your new metal fence brings to your property!


Comments
Post a Comment